|
A friend of mine recently alerted me to this new device called the Foil Quill*, a heat pen that allows you do draw freehand over foil as it transfers your designs onto paper. That is a like a dream come true for a paper lover like myself, so of course I had to have it! 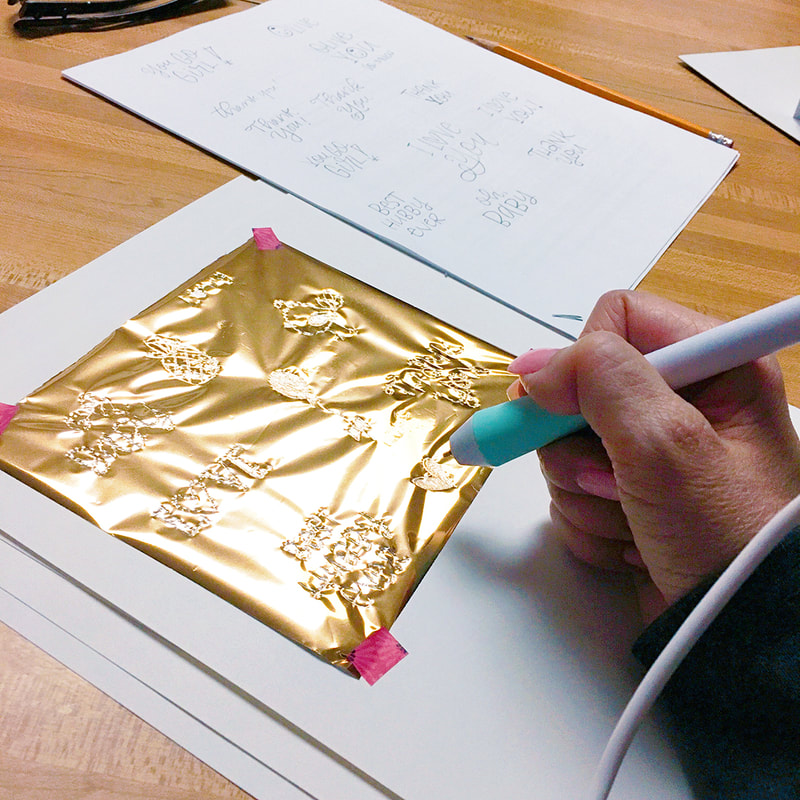 The pen comes packaged with a roll of foil and a USB cord that you can plug onto the wall with an adaptor. It's not a very long cord, but I'm sure you can also plug it into your computer. Once I plugged it in, I gave it a few minutes to warm up while I secured a piece of foil onto a sheet of card stock with washi tape and warmed up my hand doing a few lettering and doodle exercises on an extra sheet of paper. After 5 minutes or so, the pen was ready and I began to draw directly on the foil. 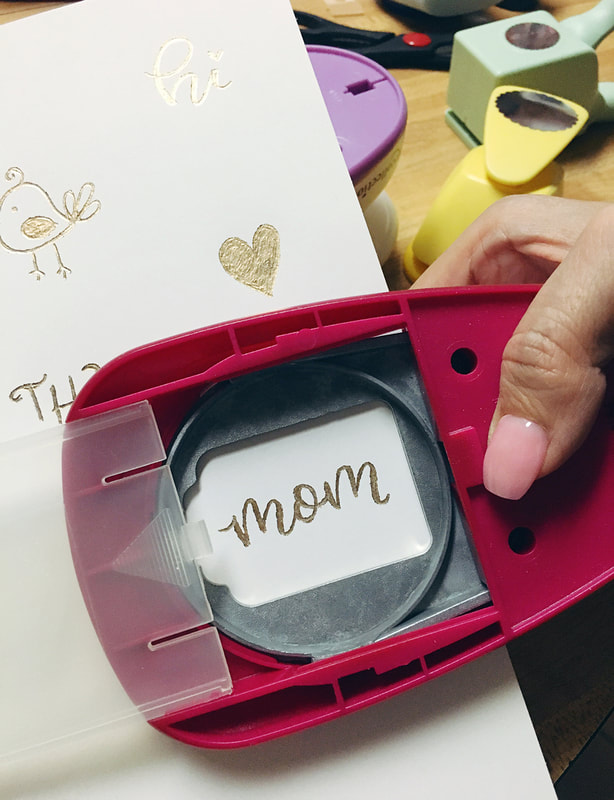 I drew slowly to ensure each stroke had enough heat to transfer. Once I was done, I used a variety of paper punches to cut out my individual designs which I will be using to make gift tags and gift enclosures. 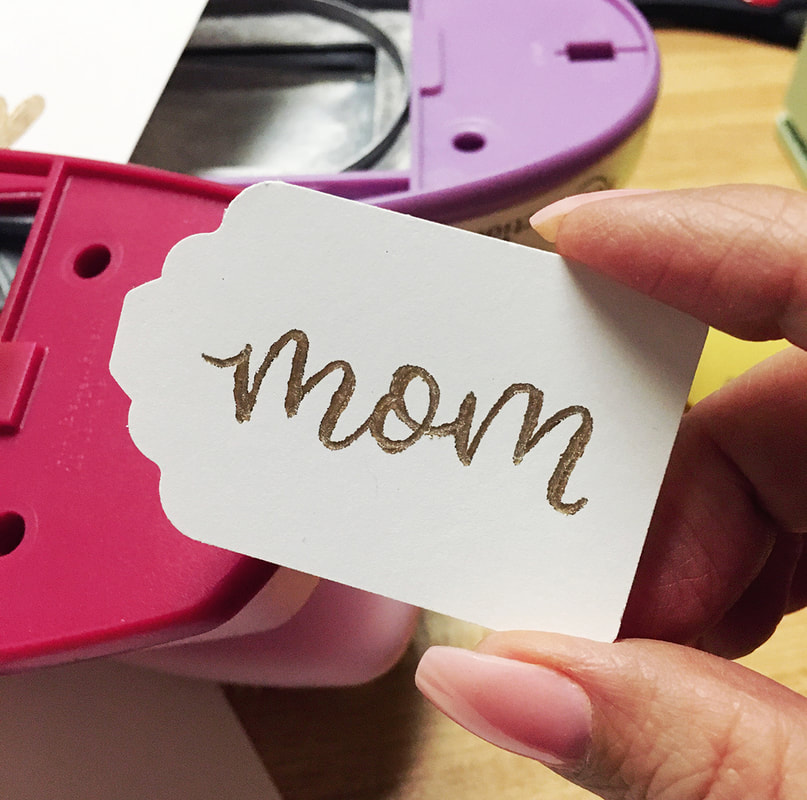 As you can see, the edges turn out a little rough. It doesn't have the precision that a laser would have, but it's not quite as noticeable from farther away. Besides, I think the rough lines give it a little more of that hand made touch. If you'd like to give this pen a try, I've included my affiliate link below for your convenience. It's a pretty fun tool to add to your collection; it definitely gives you the opportunity to expand your creativity and add a special touch to your paper projects.
Note: this is NOT a sponsored post. Just a paper lover sharing her latest finds.
0 Comments
Just sharing a few lettering tips to help you get started with my new 2019 Calendar Template & Planner Set. The printable set includes three PDF files with:
As an artist I always enjoy seeing other people’s creative process. If you’re like me, check out this postcard I drew for my sister’s new pup welcoming him into the family. It will be sent on behalf of my own dog, Paisley. ❤️  Below is the video I posted on Facebook sharing my creative process. Hope it inspires you to pick up a pen and draw.
 They say necessity is the mother of invention and I couldn't agree more! This year, along with my Christmas gifts, I am including hot cocoa spoons with gifts to my family and friends AND I'm also offering them in some of my coffee mug gift sets.
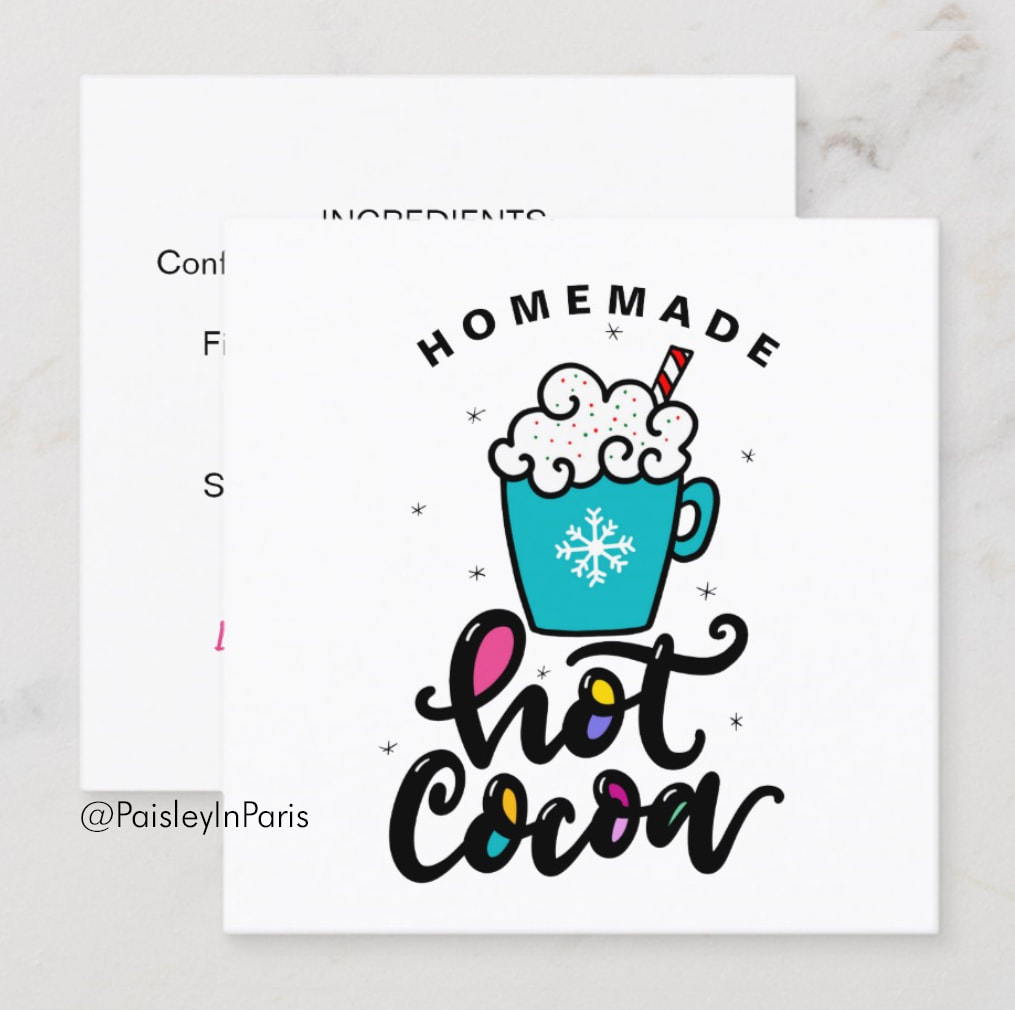
Since gluten and milk products trigger migraines and inflammation in my system, it is imperative that I read all food labels. This led me to create these cute little gift tags for others who are also gifting homemade hot cocoa mix or chocolate spoons. People with food allergies will forever be grateful that you took the time to include an ingredients list with your gift! The card measures 2x2 inches, it features my original hand drawn artwork on the cover and the text on the back can be customized to include your list of ingredients, instructions and can be personalized with your name. Now, as far as the chocolate spoons I made, I used @enjoylifefoods semi-sweet, diary-free, vegan and gluten-free chocolate chips to ensure EVERYONE can enjoy a cup of hot cocoa regardless of their dietary restrictions. I just melted the chocolate chips, poured them into each spoon, topped it with crushed peppermint candy, placed in the fridge to cool or a few minutes and wrapped them up to gift. Because I like to taste the chocolate in my hot cocoa, I use two spoons in 10 ounces of hot almond milk and add a dash a cinnamon. Yum! The chocolate spoons can also be used to sweeten your coffee and make a hot mocha. If you’re a chocolate lover, these treats will totally hit the spot! By the way, I still have a few mug sets available with gluten-free cookies and these diary-free chocolate spoons. Treat yourself or a loved one. You’ll love them! 😋 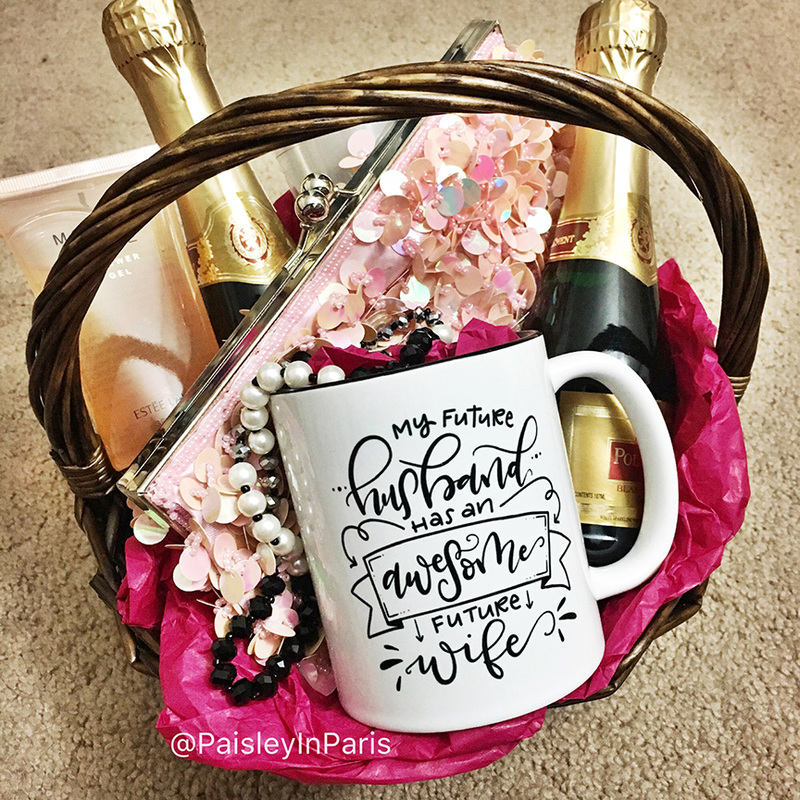 Late last summer I received a custom lettering request for a mug that read: "My future husband has and awesome future wife". At first, I felt like it seemed like a lot of text to go on a mug, but being the problem solver than I am, I pulled out my sketchbook and played aroudn with different ways to arrange the text so that it was both artsy and easy to read.
The trick to making text easy to read is by creating focal points so that your eye is drawn to a few main words, allowing your brain to easily process the info and fill-in rest as if by instinct. As an artist, I couldn't help but to pat myself on the back after I completed this design. My customer LOVED it, and that made me love it as well. Who is this mug for? The person who ordered this mug is freshly out of a relationship and hopeful to find Mr. Right one day. But I feel it would also make a nice gift from a future groom to his fiancee and a great gift for a newly engaged friend. Gift Basket Idea My daughter's school is having a silent acution to raise funds for for their music program. I created a couple of gift baskets to donate, including this one with a date night theme, featuring my "awesome future wife" mug. The basket includes: a pink clutch purse, beaded pearl necklace, champage, tea light candles and candle holders, champagne, Modern Muse shower gel by Estee Lauder, and of course, my hand lettered mug. Hoping it raises lots of funds for those little noise makers! Uh...I mean,..mucisians. Heehee. Where to find this mug You can find this and other mugs in my collection at HandLetteredMugs.com. Lettering Tips and Inspiration Join the Lettering Bootcamp mailing list to receive lettering tips and design inspiration directly to your inbox. 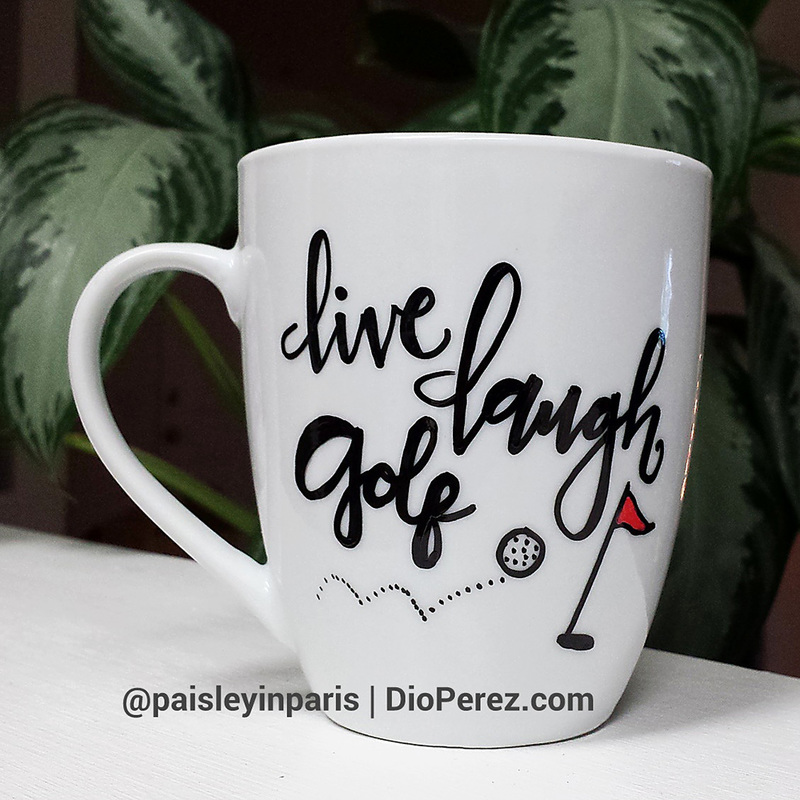 I was very touched by a coworker who found out I was selling hand lettered coffee mugs to help raise money for my daughter's 4 day band competition trip in the spring. She said she couldn't think of anything clever to put on a mug but wanted me to accept a small contribution towards my daughter's trip. After talking to her for a while, I found out her son is a school band teacher in another state and that she enjoys golfing, which sparked an idea that lead to this design.
I'm going to surprise her with this mug on Friday in appreciation of her generosity and kind gesture. She's such a sweet lady. I'm so blessed to work with such a nice group of people. Need a mug just like this? Click the button below to place your order! 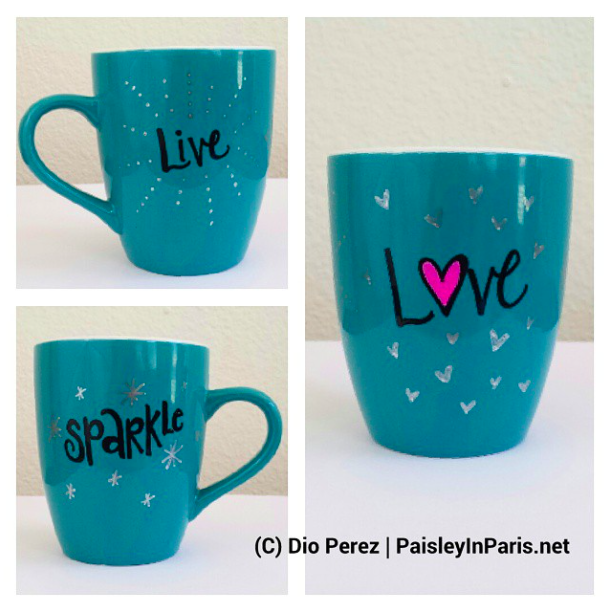 I am notorious for drawing hearts, birds and flowers, and you know what? That's okay! I think we all have our "go to" icons when doodling, as soon as we hold a pen in our hand, it just becomes second nature. The hand draws what it "knows" how to draw. It's like driving home from work and realizing you're home already but you really don't remember all the traffic stops you made, as scary as it sounds, your mind was just on automatic and got you where you wanted to go without thinking.
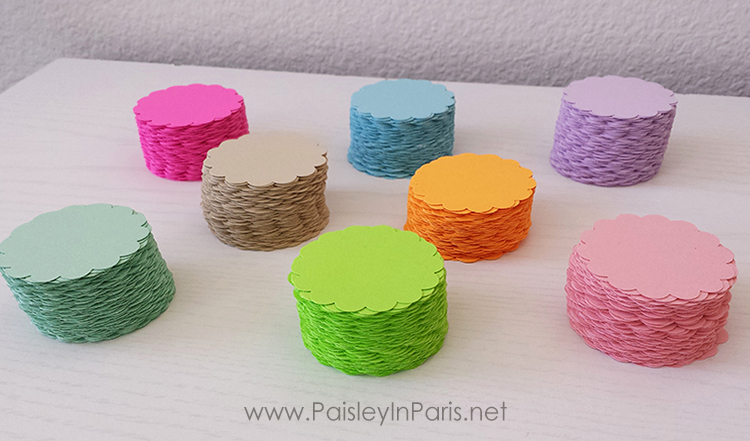
One way to keep things interesting and continue to evolve in your drawing abilities is to push yourself beyond your "automatic" setting, by consciously adding new details to your doodles and/or trying a new medium. And that's exactly what I did last week. Since I've been trying to improve my hand lettering abilities, I have practicing daily the last couple of months. I've gotten pretty comfortable with it, not so much to where I would take on a commission project, but comfortable enough to try my craft on a new medium. Being the pen/marker hoarder that I am, I had purchased a set of ceramic pens around Christmas time thinking they would come in handy for my holiday crafts. They did, but I didn't create anything magical or worth sharing until now. I took those pens to a set of plain coffee mugs and THIS happened. Yes, I was nervous about possibly ruining the mugs, but I figured I could always use them to plant some succulents in them. Luckily, I love how they turned out! Especially this one. I really like the way the metallic ink adds to the overall design. Yes, I let my hand draw what it automatically draws: hearts, "love" lettering and dots; but I applied those icons in a different combination while using a new medium - and I surprised myself! I want you to surprise yourself too and I encourage you to try a new medium whenever you have the chance. If you normally doodle with pen, use water colors. If you normally use black pen, use two different color markers instead. Try anything as long as it's a new creative process for you and don't give up if it doesn't turn out to your liking your first time around. Once you practice enough, you'll come to another break through in your artistic growth and just like that, you'll be ready for your next challenge. ~ Dio I love paper punches and die cuts, and my favorite one of all by far is the 2-inch scallop circle. These cute bits of paper goodness are so versatile, you can use them pretty much for anything! You can use them to layer onto gift enclosures like I did in the image below... 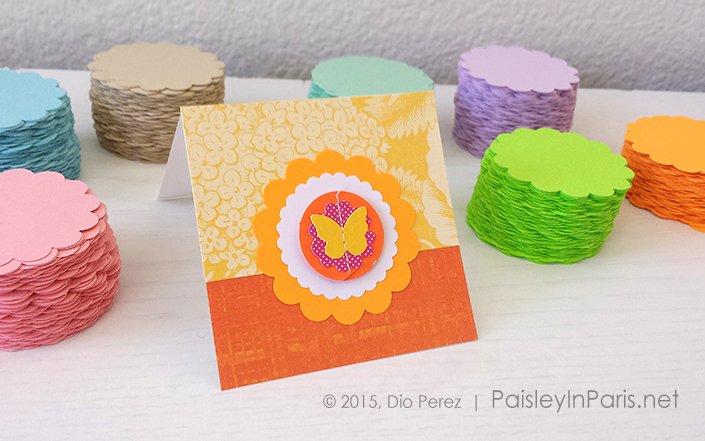
 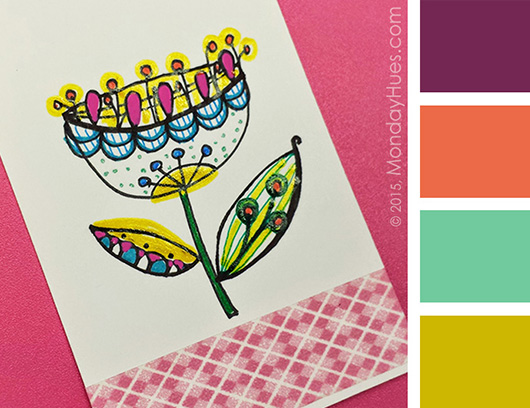 Monday Hues: In honor spring, today's color inspiration comes from a flower I drew on scrap paper, and eventually turned into a gift tag. One of the things I like to do, is find the hidden colors within an image, rather than gravitating towards the obvious, which in this case would have been pink, blue green and yellow. Instead, we ended up with a palette which consists of plum, orange, mint green and chartreuse.
DIY Doodle Gift Tags *Please note, affiliate links to some of my favorite drawing supplies are provided in the paragraphs below Supplies - below is a list of the supplies I used o create the gift tag: • Black Sharpie Pen* • 2"x3.5" piece of scrap card stock • Metallic*, Moonlight* and Glaze* Sakura gel pens • Washi Tape* The Process First I drew the flower with a black sharpie pen*, then I added color to it with different types of gel pens. While the pink Moonlight pen* is what gave the drawing the flat pink strong color, the yellow Glaze pen* gave the image its highlights with a bit of dimension and shine. The ink from the Glaze pens tends to dry raised and shiny, making your piece look as if it were embossed or treated with thermography - I love that! As a final touch, I trimmed the bottom edge with washi tape*, then punched a hole at the top to draw a string. And just like that, with a bit of scrap paper in hand, gel pens, and washi tape, I was able to create a gift tag AND draw color inspiration from it for future projects. Happy Monday, my friends! ~Dio *Please see affiliate links disclosure on sidebar |
Hi - I'm Dio!
Graphic Designer & Spanglish Lettering Artist Topics
All
My Shops
*Affiliate LinksI am often asked what tools I use to create my work, so I’ve incorporated Amazon affiliate links in my posts to products I like, use and recommend. This means that if you click and make a purchase, I will earn a small commission paid for by Amazon, not the customer.
Please note that anything marked with an asterisk (*) indicates an affiliate link. Resources*List of products I use & trust:

E-Courses
|

© 2018-2024 Copyright, Dioscelina Perez
42222 Rancho Las Palmas Drive #264, Rancho Mirage, CA 92270
42222 Rancho Las Palmas Drive #264, Rancho Mirage, CA 92270
Proudly powered by Weebly